The Sims 4 is a popular life simulation game that allows players to create and control their own virtual characters or Sims. One of the fun aspects of the game is decorating and designing your Sim’s home. (www.stellardental.my)
The game offers innumerable customization options for your interior design. One way to add personality and style to your Sim’s home is by using Half Tiles.
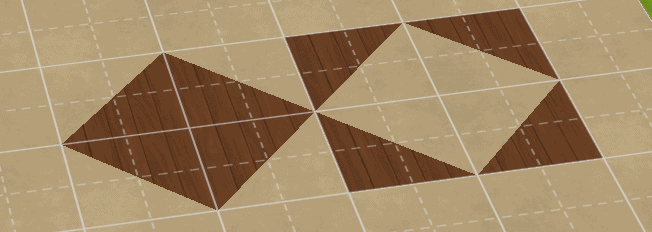
Half tiles are tiles that are cut in half, which allows for more flexibility and customization when designing a space.
Half tiles open up numerous possibilities for your design variations.
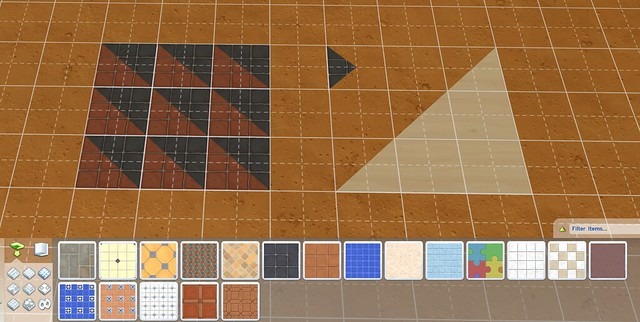
By Alternating colors between half tiles, you can create many diagonally oriented patterns.
Via SimsVip
In this article, we will go over step-by-step instructions on how to make half tiles in Sims 4.
Step-by-Step Guide to Creating Half Tiles in Sims 4
If you are new to the game, creating half tiles can prove to be a complex and brain-teasing task.
Some players end up taking the more difficult and chaotic path, like creating half walls and then duplicating half walls, etc.
This can get quite irritating at times and your imagination can get bottlenecked by the workload of this technique.
Luckily, Sims 4 has a much easier way to create and place half tiles in your beloved home.
Let’s break down the process of manipulating half tiles in concise and easy steps.
Step 1: Enter Build mode
To start building, you need to enter the Build mode by clicking on the Build icon in the top right-hand corner of the screen.
This will open up the Build mode menu, where you can access all the building tools.
Step 2: Create a New Room
The next step is to create a new room where you will experiment and design with your half tiles.
To do this, choose the “Rooms” option inside the Build Mode menu.
Click and drag your mouse to create a new room in any size and shape you want.
Step 3: Choose the Flooring tool
Inside the Build mode, select the flooring tool from the Build mode menu.
You can find this tool on the left-hand side of the screen.
The flooring tool allows you to choose from a variety of flooring options, including tiles, wood, and carpet.
Just choose the tiles flooring to start placing your half tiles.
Step 4: Selecting the Tile to Place
Now comes the fun part, choosing the tile you want.
There are countless tile designs and colors in the game to choose from.
Once you have decided, click and drag your chosen tile onto the floor where you want to place it.
This will create a standard-sized tile. You can choose from various tile options, including marble, ceramic, and stone.
Step 4: Activating the Grid
To create half tiles, you need to activate the grid.
To do this, press the ‘Tab’ key on your keyboard.
The grid will give a visual presentation of how the tiles will sit, this helps you align and position your tiles accurately.
Step 5: Switching to Quarter and Half tiles
By default, your tile placement will work with standard-sized square tiles, but you can switch between quarter and half tiles effortlessly.
To do this, just press CTRL + F on your keyboard, this will replace standard-size tiles with quarter tiles.
Note: On PlayStation, you can achieve the function of CTRL + F with your square key.
From here you have two options for placing half tiles specifically:
- The first option is to combine two quarter tiles to create a half tile and work your way up like this.
This will allow you to have more control over your designs, allowing you to improvise and mix in some interesting quarter tile designs in there as well.
But on the downside, this can be a bit more time-consuming than our second option.
- On the other hand, you can simply press F5 on your keyboard to switch to half tile placements entirely.
Now every tile you place will be a complete half tile.
Step 6: Experiment with different tile patterns and designs
Using half tiles is a great way to add more detail to your builds.
They can be used to create interesting patterns and designs that would not be possible with standard tiles alone.
Experiment with different tile patterns and designs to create unique and visually appealing floors.
Step 7: Finish Decorating

Now that you have created your half tiles, it is time to finish decorating your room.
Add furniture, decorations, and other items to make your room feel complete.
You can also experiment with different combinations of standard-sized, quarter, and half tiles for your walls as well, contrasting or matching with your floor to create a unique and personalized look.
Step 8: Share your Build in Sims 4 Community
Once you have finished creating your half-tile floor, save your build and share it with the Sims 4 community.
The Sims 4 community is a great place to share your creations and get inspiration from other players.
Conclusion:
In conclusion, building half tiles is a fun and easy way to add personality and style to your Sim’s home.
By following these simple steps, you can create your own half tiles and experiment with different combinations to create a space that is uniquely your own.
So go ahead and start designing – the possibilities are endless!