If you’ve been playing the campaign of Call of Duty: Black Ops Cold War, you’ve probably come up against a floppy disk code that needs decrypting. In this guide, we’ll walk you though how to access the Call of Duty floppy disk code in your game. It’s not guaranteed to be the same for everyone, so read through and you should find it easy to pick up your code in your game.
Call of Duty Floppy Disk Code Guide

The code is required for the story mission Operation Chaos. It sees you collect evidence in the major set of story missions, and then use them to solve a puzzle.
It’s important to note that the location of this evidence is fixed for everyone. It’s just the code that isn’t the same for all players. That means you can scan through this guide, pick up all the locations, and then work on your code afterwards.
To access Operation Chaos, you first need to finish the story mission Fracture Jaw. It contains a side mission that is locked by the floppy disk code we’ll get to here.
There are three story missions that contain this evidence: Nowhere Left to Run, Brick in the Wall, and Redlight Greenlight.
Nowhere Left to Run Mission Evidence Location
This evidence is found at the point when you are interrogating Qasim on the rooftop. You need to choose the dialogue option that doesn’t throw him off the roof, which will see him give you the evidence.
Brick in the Wall Mission Evidence Location
Around the halfway point in this mission, you meet up with an informant in a bar. They will present you with an optional objective, Rescue or Silence the informant. (Phentermine) This will give you a side quest marker as you go up the stairs and reach the balcony.
Hug the left wall and travel through the buildings to reach this balcony. When outside, kill the guard outside the door and pick the lock to enter the door. Now there are three guards around the informant. It’s possible to kill them all without being spotted, so try to do that.
The evidence you’re looking for is on the table, so you can do what you want with the informant.
Operation Redlight, Greenlight Mission Evidence Location
This mission gives you an optional objective to collect photo intel throughout the mission. There are six maps in the mission, but photographing three will get you the evidence you need.
One is in the security hut at the start of the mission that you need to go through. It’s on the wall.
When walking through a high walkway, you need to kill a number of guards below. Jump down and check the desks, there’s a map on the wall near one.
When you have a firefight in the fake American town, there’s a bar to your right. Go inside and head upstairs, the map is on the far wall.
Halfway through this mission, you’ll end up in a command centre. Hack the terminal to open the door, and then look on the right of the wall in the room you just opened. The map is there.
Later in the mission, you and Woods will run down a corridor while being fired at. Drop down and run into the room on the right. The map is on the wall, with a mannequin standing near it.
The final map location is towards the mission’s end. You press a big red button to open a grate and get into a hangar. Stick to the right wall and walk around the facility. When you find a room on the right, go into it. The map is on the wall inside.
Those are all of the map locations for this mission. Any three will do, but collecting six will increase your completion rate.
Decrypt the Evidence
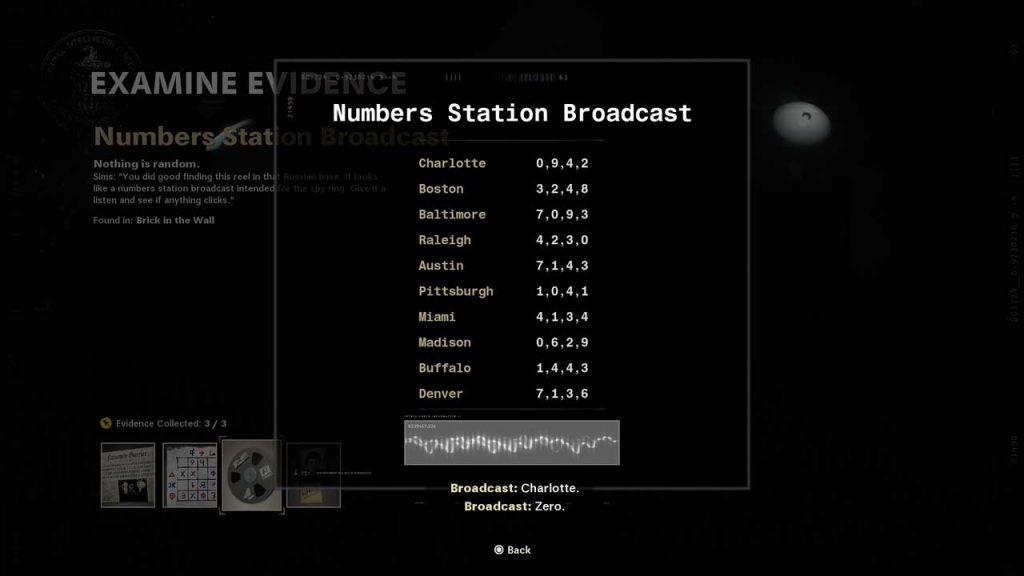
Now you should have all three pieces of evidence. It’s time to start decrypting them.
The way to do this is by linking a code and a passphrase, which is a city, that’s common throughout all three pieces of evidence.
This is where it gets tricky to explain. What you’re looking for is the red and blue text throughout each piece of evidence. A paper may just have letters highlighted in the headline. Alternatively, a coded paper will have number sequences that you need to organise and figure out the missing numbers from.
Now you will need to look at a radio with numbers and cities. The letters will make up one of these cities, and the numbers will be associated with one of the other cities on the list. Match these codes, and you will have the number that you need.
The passcode will relate to the city name that you have. The passphrase will be the city associated with the numbers that you identified. This will authenticate your access, and unlock the side mission.
That’s all there is to know about how to get the floppy disk code. We’re sorry we can’t be more specific, but it really is random for each player. The only other tip we have is to keep a pen and paper handy when decrypting. You’ll need it.
Image Source: YouTube